REVIEW · LUCERNE
Lucerne: Photography Walking Tour
Book on GetYourGuide →Operated by Passenger Diaries Swiss Travel Tours · Bookable on GetYourGuide
Lucerne is a photographer’s playground, and this tour gives you a plan. You’ll walk the city center and learn how to shoot Lucerne’s best-known landmarks with a professional photographer guide—plus you’ll get time to try what you learn in between photo stops.
I especially like that it’s friendly for first-timers and serious shutterbugs alike. You’ll get practical guidance for everything from a smartphone to a DSLR, and you’ll cover major sights like Chapel Bridge and the Musegg Wall without rushing.
One thing to consider: it’s a moderate walking experience, with multiple photo stops over about two hours, so bring comfortable shoes and pace yourself.
In This Review
- Key things that make this tour worth it
- A clear goal: better photos, not just more sightseeing
- Start at Torbogen Luzern: find your angles before you even stop
- Chapel Bridge photo stop: how to frame the icon without the usual mess
- Lake Lucerne and KKL by Jean Nouvel: mixing old water with new design
- Lion Monument: the quiet side of Lucerne photos
- Musegg Wall (Museggmauer): where textures and angles multiply
- Spreuer Bridge: practice reflections and storytelling
- Reuss River: close-ups, atmosphere, and the last practice round
- The pro photographer guide: the real reason the photos improve
- Price and value: why $146 can be a smart deal for photo-focused travelers
- What to bring (and what to expect from a 2-hour walk)
- Who should book this Lucerne photography walking tour?
- Should you book it?
- FAQ
- How long is the Lucerne photography walking tour?
- How large is the group?
- Where do I meet the guide?
- What sights are included in the route?
- Is the ticket to Lucerne Castle included?
- What languages is the tour guide speaking?
- Do I need a camera, and is there a skill level requirement?
- Is food and drinks included?
- What should I bring besides a camera or phone?
- Is free cancellation available?
Key things that make this tour worth it
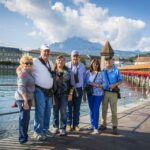
- Small group size (up to 10, with limited 8 participants) means you’re more likely to get personal feedback on your photos
- Castle lift ticket included, so you can chase higher angles without extra planning
- You’ll photograph Lucerne icons like Chapel Bridge and Lion Monument, plus bridges, river views, and old-town corners
- Traffic-free Old Town and wall areas like the Musegg Wall give plenty of “shootable” texture
- The guide’s tips work for smartphones and cameras, no prior experience required
- You get to see KKL by Jean Nouvel along the route, adding modern architecture to the usual postcard shots
A clear goal: better photos, not just more sightseeing
This tour is built around one simple idea: you don’t need to be an expert to make stronger images. The guide helps you see what matters—light, angles, composition, and how to frame iconic places—then you practice immediately at each stop.
What I like is that you’re not locked into one style. If you’re into clean, classic postcard shots, you’ll get plenty of chances. If you prefer moodier, closer details, you’ll also have room to experiment. And because the group stays small, you can ask questions without feeling like you’re shouting over a crowd.
You’ll spend the whole two hours moving through Lucerne’s most photographic zones: the old-town heart, lake-adjacent viewpoints, and quieter corners by bridges and the river. The result is a walk that feels like learning the city’s “photo routes,” not just a list of landmarks.
You can also read our reviews of more tours and experiences in Lucerne.
Start at Torbogen Luzern: find your angles before you even stop
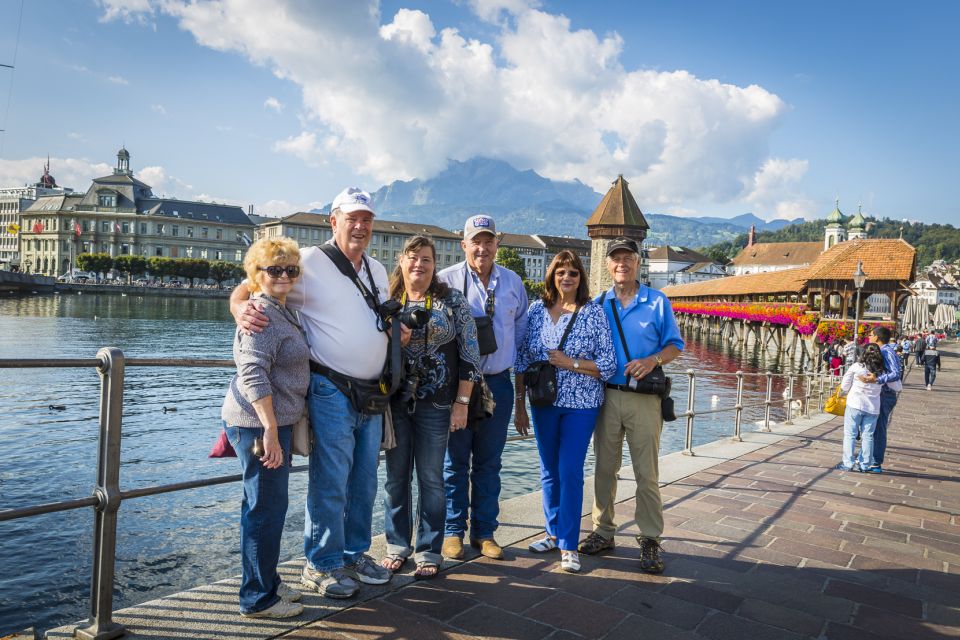
You begin at Torbogen Luzern, at the monumental arch in front of the main entrance to Lucerne Train Station. It’s a smart starting point because it puts you right where Lucerne’s walking paths and main sights start to branch.
Before you head into the older areas, you’ll get oriented and likely get a first lesson on how to look at scenes in layers: foreground, main subject, and background. In a place like Lucerne, that matters because the city constantly offers strong “stacked” views—bridge + water + Alps in the distance.
Practical tip: if you’re using a phone, take a second before each photo stop to check exposure or HDR settings (whatever your model uses). The goal is to avoid the common mistake of letting the brightest parts (water reflections, bright stone) blow out.
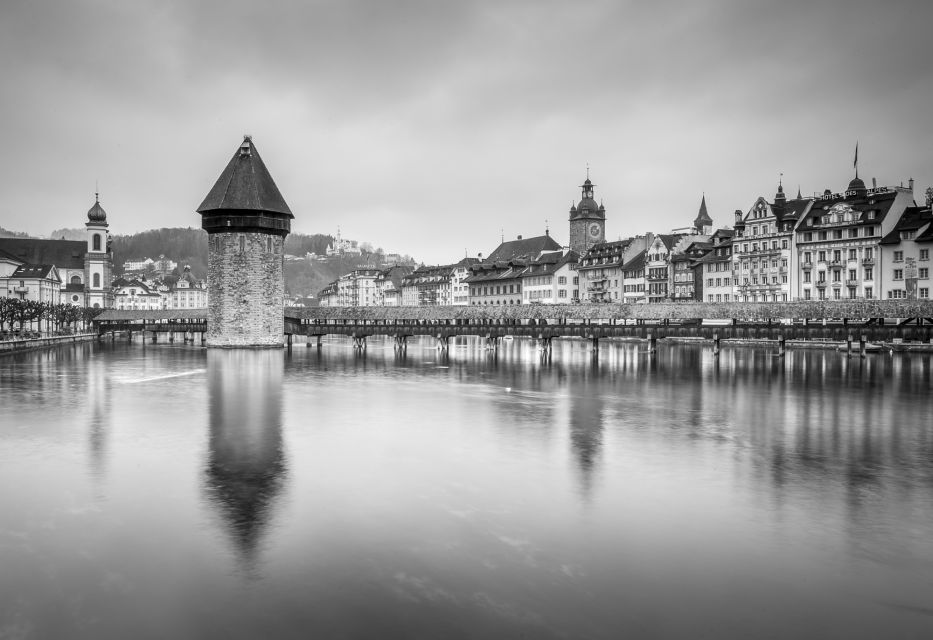
Chapel Bridge photo stop: how to frame the icon without the usual mess
Next up is Chapel Bridge, where you get a dedicated photo stop plus a guided visit and walk-through. This is one of those places that many visitors photograph from one angle and call it done. The tour nudges you to do better.
You’ll get help thinking about:
- Where to place the bridge in the frame (centered, off-center, or layered with nearby architecture)
- How to handle repeating lines so the image doesn’t feel flat
- How to use the surrounding water and town textures for depth
The stop is short—about 15 minutes—so you’ll want to decide quickly what you’re trying to capture: a classic wide view, a closer pattern shot, or a perspective angle that leads your eye across the bridge.
If you love architecture, this is also a great “warm-up” for Musegg Wall later. You’re training your eye to see structure and rhythm, not just scenery.
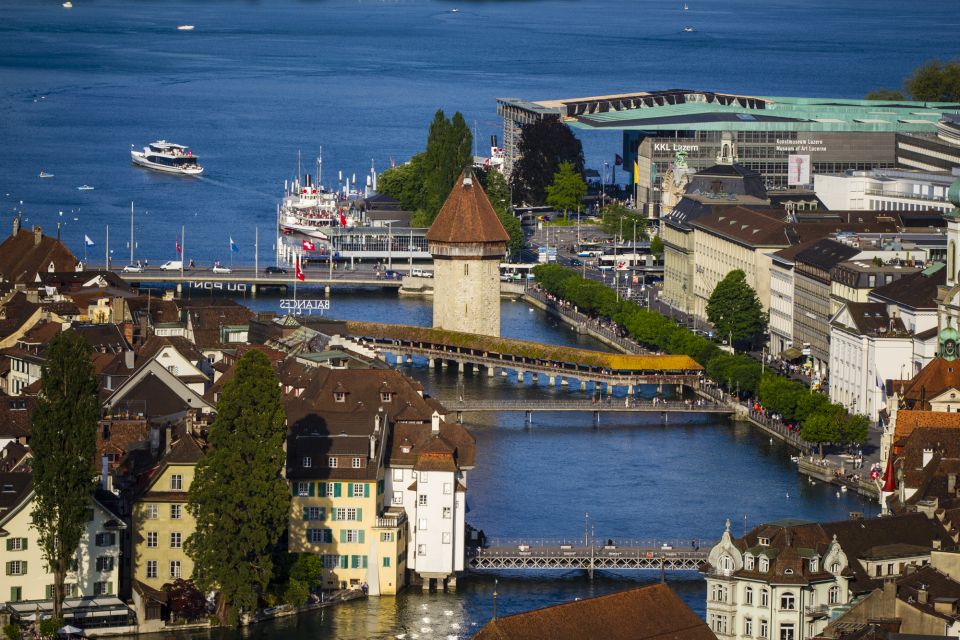
Lake Lucerne and KKL by Jean Nouvel: mixing old water with new design
Then you head toward Lake Lucerne for another photo stop and guided sightseeing walk (also about 15 minutes). This is where the water starts doing a lot of the work for you—reflections, sky color, and the way the shoreline shapes the view.
You’ll also spot the Culture and Convention Center (KKL), designed by French architect Jean Nouvel. That’s a nice change of pace. Instead of only shooting medieval-ish postcard views, you get at least one modern-architecture moment—useful if you want variety in your photo set.
Even if you’re not chasing “art photos,” this stop helps you practice one key skill: combining subjects that don’t naturally match. When you frame lake views with a crisp building silhouette in the scene, you learn how to keep the image clean and intentional.
Possible drawback here: because it’s a quick stop, it can feel busy if you’re trying to get lots of variations. If you want a lot of shots, focus on capturing 2–3 strong compositions rather than 20 average ones.
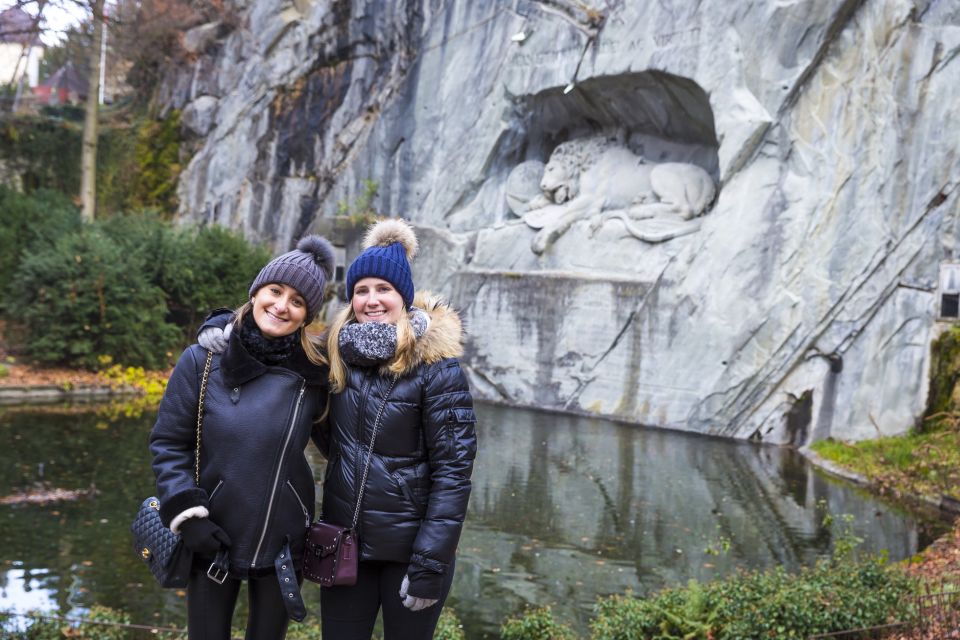
Lion Monument: the quiet side of Lucerne photos
At Lion Monument, you get another 15-minute stop with visit, guided tour, and time to walk through the area. This is a different kind of subject than bridges and walls. The tone is heavier, and the visuals tend to reward closer attention to shape, surface, and the way the monument sits in its surroundings.
What the guide can help you with here is seeing how to avoid a photo that feels too wide and generic. With memorial-type subjects, your best images often come from choosing the right level of context—enough to show place, but close enough to show meaning.
You may find it helpful to:
- Lower your camera slightly to emphasize form
- Look for the angle where background distractions simplify
- Decide whether you want emotion through close detail or through the broader setting
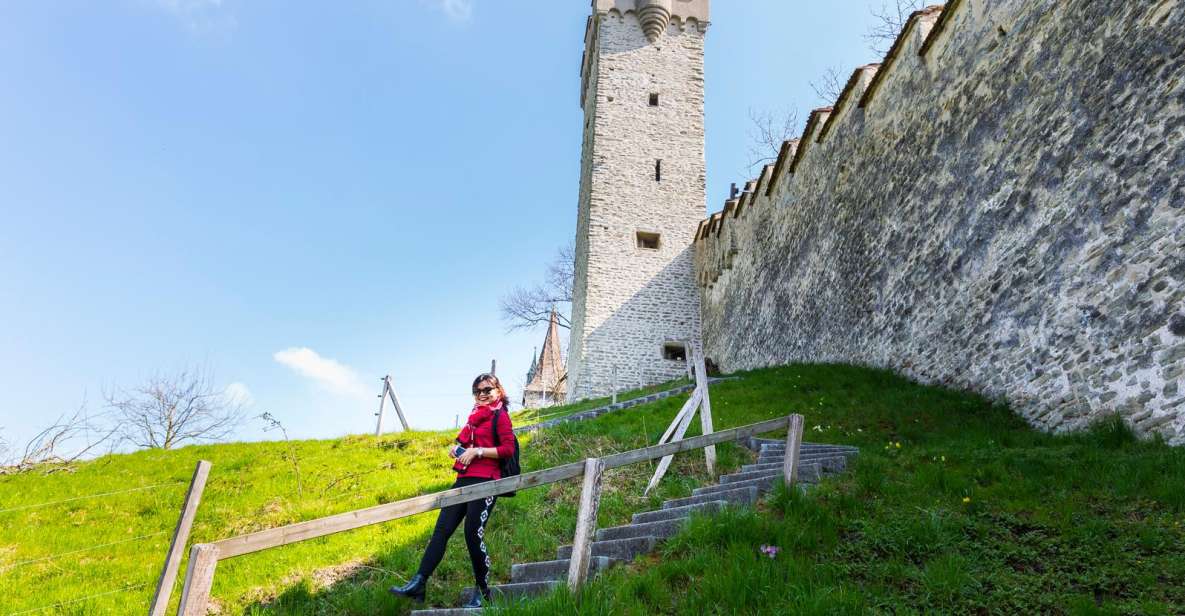
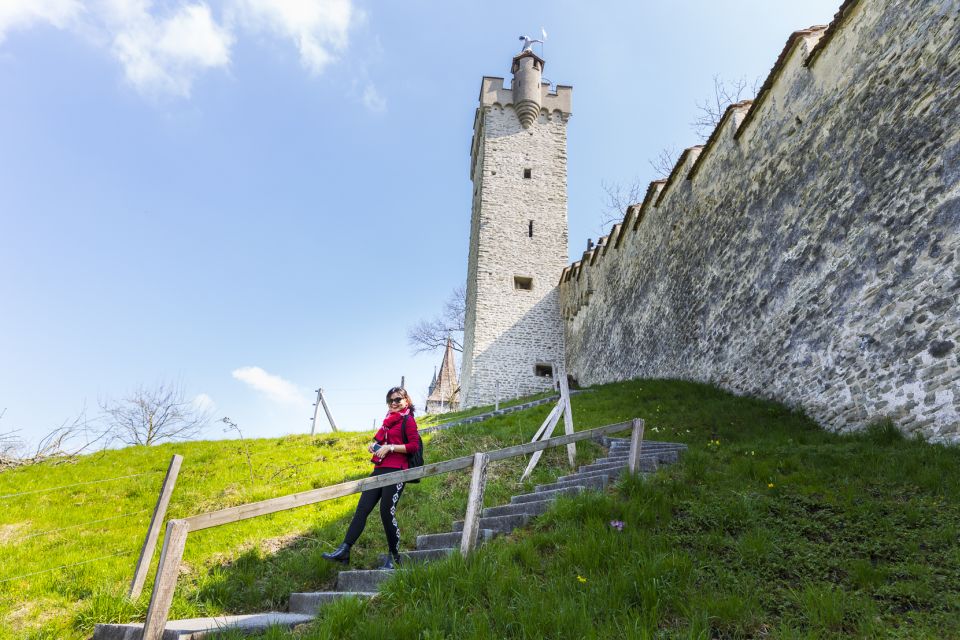
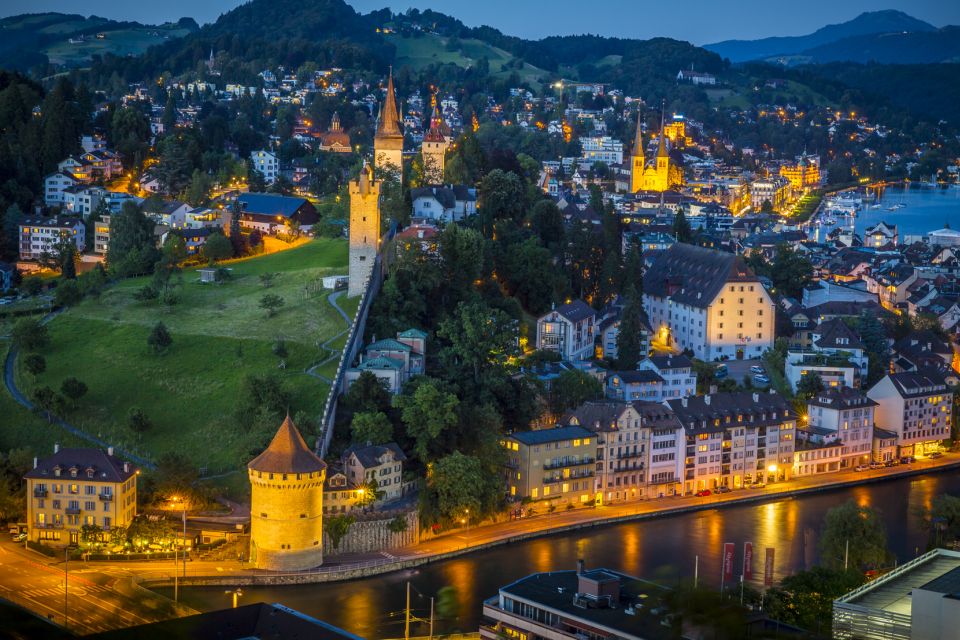
Musegg Wall (Museggmauer): where textures and angles multiply
The Musegg Wall is the longest stop on the walk (about 30 minutes), with photo time, guided visit, sightseeing, and walking. If your goal is to make photos that feel Lucerne-y, this is a big one.
Why it’s so valuable for photography: walls give you texture, repetition, and strong lines. They’re also excellent for practicing “staying power” shots—images where small changes in angle make a huge difference.
And this is also where the tour’s castle component becomes especially relevant. You’ll have a lift ticket to Lucerne Castle included in the price, which gives you a chance to work at a higher vantage point. Higher angles can make everything click: you can show the city’s layout, connect bridges and water, and include more Alpine context in a single frame.
A quick reality check: 30 minutes at a wall and viewpoints can go fast, especially if you want to experiment. If you’re the type who loves tweaking settings and re-shooting, this stop gives you enough time, but still keep one eye on the group pace.
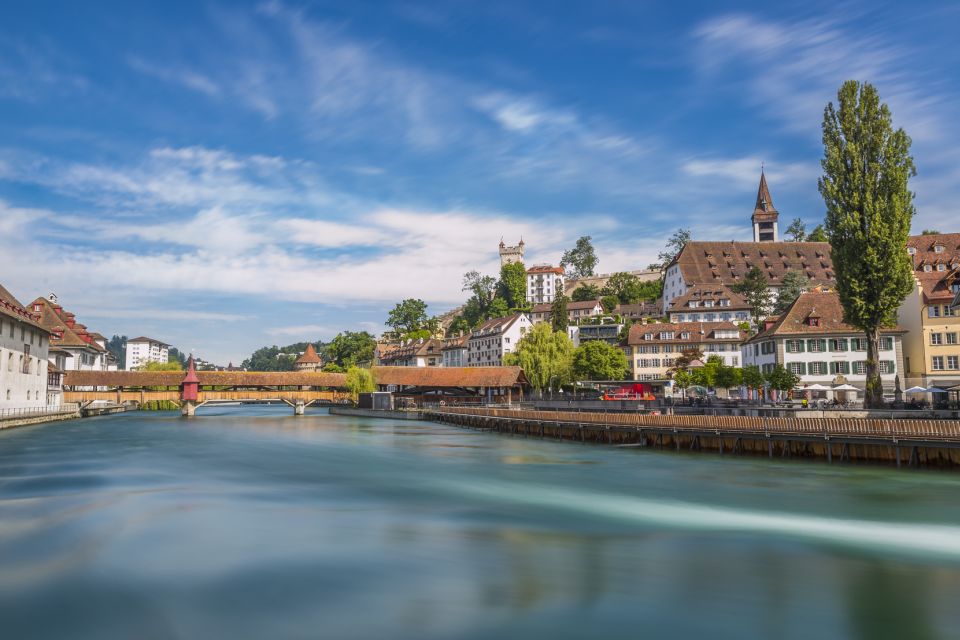
Spreuer Bridge: practice reflections and storytelling
Next comes Spreuer Bridge with about 20 minutes of stop time, including visit and guided tour. Bridges are great for photography lessons because they naturally create a “lead-in” for your eye: the structure guides you toward the scene beyond.
This is also where reflections often become your friend. Even if the water isn’t perfectly mirror-like, you can still use it to add depth and scale. The guide’s coaching here tends to focus on framing so your image reads clearly—bridge + water + background, with fewer clutter elements.
What I like: you’re not only photographing the obvious. You’re learning how to turn a simple walking crossing into a scene with layers. If your photos lately feel too flat, bridge stops like this are where you start fixing that fast.
Reuss River: close-ups, atmosphere, and the last practice round

You finish at the Reuss River area with about 25 minutes for photo stop, visit, guided tour, sightseeing, and walking. This portion is valuable because the river offers lots of subtle photo opportunities without demanding a perfect “main view.”
Think about the river as your practice lab:
- Try a tighter crop to make texture the subject
- Step a bit left or right to see how background lines shift
- Shoot from slightly higher or lower to change how water occupies the frame
By this stage, you’ll likely be more comfortable with what your guide is asking you to do. That means you can focus less on figuring out the basics and more on creating a few images you truly like.
Then you return back to Torbogen Luzern, ending at the meeting point. It closes the loop nicely: you start in the rail-station area and end with your photos organized mentally into a complete Lucerne story.
The pro photographer guide: the real reason the photos improve
The standout feature here is the professional photographer guide. This isn’t a “follow me for selfies” walk. The guide is there to teach you how to see and how to translate what you see into a photo that looks intentional.
The tour is designed for all skill levels, and you don’t need previous experience. That matters because beginner mistakes are usually not about talent—they’re about technique and decision-making. A good guide fixes both.
Also, you can bring any device you want: a point-and-shoot, DSLR, or a smartphone with a camera function. You’ll be guided through your equipment choice instead of treated like you’re using the wrong tool.
One more useful angle: non-photographer friends are welcome. If you’re going with someone who just wants to enjoy Lucerne, they can still tag along and witness the best Alpine festival atmosphere at leisure (if your timing lines up). That makes it easier to book without worrying about turning the trip into a camera class.
Price and value: why $146 can be a smart deal for photo-focused travelers
At $146 per person for a two-hour small-group walk, this is not the cheapest way to “see Lucerne.” But it is priced in a way that makes sense for what you actually get.
You’re paying for:
- A professional photographer guide
- Practical photography tips you can apply immediately
- Small-group time (limited to 8 participants)
- A lift ticket to Lucerne Castle included
- A structured route through multiple landmark zones
If you’ve ever tried to take great photos while also trying to navigate a new city, you know the problem: you spend your best time hunting angles instead of learning them. Here, the guide shortens that learning curve. You come away with photos you understand how to recreate, not just random souvenirs.
Food and drinks aren’t included, so you’ll still want to plan a snack break before or after. But the tour gives you a photo payoff that many purely sightseeing tours don’t.
What to bring (and what to expect from a 2-hour walk)
Come with comfortable shoes. The walking is described as moderate, but you’re still moving between photo stops and doing some guided exploring along the way.
You don’t need special gear. The tour works with:
- Smartphone cameras
- Compact cameras
- DSLR or other camera setups
I’d bring one small habit that helps on tours like this: charge your device fully and clear space before you go. You’ll likely take more photos than you planned, because each stop is an opportunity to apply a new idea.
If you’re a serious photographer, feel free to bring your normal kit. If you’re a casual shooter, bring your phone and trust the process. The guide is there to meet you where you are.
Who should book this Lucerne photography walking tour?
This tour is a great fit if you:
- Want a structured way to photograph Lucerne’s most known sights
- Feel stuck with your photos and want quick, usable tips
- Like small groups and don’t want to fight for attention
- Plan to visit Old Town and the lake area anyway, and want your time to pay off
It’s also a nice option if you’re traveling with a friend who doesn’t care about photography. They can enjoy the walk, landmarks, and atmosphere while you work on shots.
If you’re someone who wants a long, slow sightseeing day with lots of free time, you might find two hours slightly short. But if you’re aiming for a high-impact “photo improvement session” in Lucerne, it’s well matched.
Should you book it?
Yes—if you want your Lucerne photos to look like you tried, not like you hurried. The value is strongest when you actually follow the guide’s prompts and use the stop time to test ideas. With a small group and a pro photographer guide, you get the kind of attention that usually costs extra on your own.
I’d skip it only if you dislike walking between multiple stops or you want a fully free-roam day with no guided structure. Otherwise, this is one of the more efficient ways to turn Lucerne’s icons, bridges, and viewpoints into photos you’ll genuinely want to keep.
FAQ
How long is the Lucerne photography walking tour?
The tour lasts 2 hours.
How large is the group?
It’s a small group of no more than 10 people, with a limit of 8 participants.
Where do I meet the guide?
Meet at Torbogen Luzern, at the monumental arch in front of the main entrance to Lucerne Train Station.
What sights are included in the route?
You’ll visit and photograph Chapel Bridge, Lake Lucerne, the Lion Monument, the Musegg Wall, Spreuer Bridge, and the Reuss River.
Is the ticket to Lucerne Castle included?
Yes. A ticket for the lift to Lucerne Castle is included.
What languages is the tour guide speaking?
The tour is offered in Spanish and English.
Do I need a camera, and is there a skill level requirement?
No prior experience is needed. You can bring any camera or smartphone with camera functionality.
Is food and drinks included?
No, food and drinks are not included.
What should I bring besides a camera or phone?
Comfortable shoes are recommended.
Is free cancellation available?
Yes. You can cancel up to 24 hours in advance for a full refund.